Friday, August 30, 2013

Fishing: An Art Gallery Experience

Well, a while back, I got really interested in applying for various art shows. There are tons of call for entries floating around and I figured, why not? So I made a lot of stuff. Hence the teabowls previously. Well, I didn't make it into most of them. A little disappointing at first, but it was a good experience for me. However, I did make it into one! Photo: Our new Exhibit "Of The Sea" is bringing the work of 16 artists from 9 states to Joplin. The opening will be June 20th. We hope to bring a sea breeze from the coast right down Main Street Joplin in the middle of the summer. Mark your calendars now.
It was terribly exciting. I got accepted into a show! That was last month and I now have my pieces back, so I figured I would post the pictures of them. I made two fish, thrown on the wheel, detailed, and high fired.


The set of two fish made it into the show. I was quite pleased.


The fish with the plate did not make it into the show; I was not bother by this as it was more of a beta test than anything else. I liked the plate, but not enough to repeat it with the large fish. The fish on the plate was a miniature version, only about 3.5 inches tall. Adorable, that's for sure, but not as well done as the larger ones. Quite fun! 

Tuesday, June 25, 2013

Felted Soap: How To

While I am usually a potter, sometimes I like to keep my hands clean instead of dirty! When I take a break from the wheel, it's time for a foray into a new realm of craft. I have a huge collection of soap, so this time, I decided to try felting soap! This a form of wet felting. Wet felting is a form of felting with good wool and water. The wool interlocks and shrinks as it is kneaded and rubbed with soapy water.

Here's what you need:
A bar of soap
Scissors
Old nylon stockings
Sheep's wool (other pure wool works as well)
One bowl of hot water
One bowl of cold water

 1. Spread out the wool so it is almost see through ,as show in the picture below.


2. Lay the bar of soap in the middle of the spread wool. Make sure the wool is spread out enough to cover the entire bar longways and long enough to wrap around the bar at least once. 


 3. Wrap the wool around the bar of soap. Make sure it is fully covered. Don't let the soap peek out!


 4. I wanted to use do some different colors, so I wrapped some white wool around the purple wool.


5. Place the wrapped bar of soap aside for a moment. Pick up your nylons and cut the foot off. It needs to be about 4 inches long. It will stretch as it gets wet.


6. Drip hot water onto the wool-wrapped soap and pat it down. The wool should be entirely wet and the soap will be bubbling a little when you are done. 


 7. Carefully drop the damp, wool-wrapped soap in the nylon sock.


 8. Now dampen the soap and sock with cold water. Start rubbing it around in your hands, just like you were washing your hands. Once it isn't cold anymore, dip it into the warm water and do the same thing. Go back and forth between the cold and warm water, constantly rubbing the soap between your hands. It will start to lather. Repeat this for about 15-20 minutes. You can peel the nylon back to check to see if the wool is shrinking and interlocking over the soap.


9. This is what the finished product will look like. Once you see that the wool has shrunk around hte soap, remove the nylon and put it out in the sun to dry! 

This is a fun easy project and it comes in handy in the shower or at the sink. It's handy because the wool will continue to shrink down as the soap wears down. Eliminates gross wash clothes! And when the soap is all gone, you have a nice little scrubbie for your dishes. 


Monday, June 17, 2013

Tons of Teabowls

Well, all those teabowls have come out of the kiln. Some came out really well, some needs a little more work next time. But what fun!
Scribbles

Striation 

Gearhead 

Ripped

Spun

River Roll

River Ride 

Dragon 

Barely There

Tipsy

Raindrops 

I am really enjoying these, I think I will keep working on teabowls. I love the way they feel in my hands and I do drink tea of of them. Nw I just need some green tea matcha to make some traditional tea! Learning a traditional Japanese tea ceremony would be excellent...

Friday, April 19, 2013

Teabowl Experimentation

So I have recently gotten into traditional teabowls. I did not realize there are so many kinds. I've been doing some research on these pieces and it is fascinating! Generally, I have learned about three different types of teabowls: tsutsu-jawan is a tall, tube shaped bowl, ko hagi jawan is a small teabowl, and tenmoku-jawan is a v-shaped bowl. Each has a different role in the tea ceremony. I haven't quite figured that part out yet. But I am working on ko hagi jawans, which are approximately 4 inches in diameter. I've been playing with porcelain clay and doing black and white contrast pieces. 


This was my first shot at slip trailing! Turned out ok. 


I also decided to work on some colored slip pieces as well. I decided to work with more organic forms for now; I might do some more geometrics and linears later on. 


I am going to keep working on these for a while, each is going to be a little different. Good stuff! 

Friday, April 5, 2013

The New Chapter

I have been stuck on a normal grind recently, no new work, nothing interesting happening. And then, two weeks ago, it was like my brain had been electrocuted. Ideas started pouring out. And then I decided....it is time for me to start applying to different ceramic shows across the country. Why not? It isn't something I have tried before and I am finally comfortable enough with my work to start putting it out there! I have found four or so shows to try apply to over the next two months. Some are specific shows; I will work on certain pieces for that show. Others are functional ceramic art shows, so I will put from pieces I already have or make new pieces if I am on a roll. Wish me luck, it's a new chapter!

Sunday, February 24, 2013

More Tea-related Business

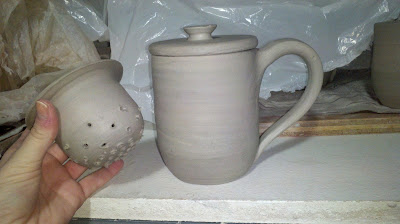
As I continue on my quest for amazing tea, I have decided to make tea mugs with lids. And strainers! It is incredibly tedious and annoying, I have to admit. It took me ten minutes to poke tiny little holes in the strainer piece and then I will have to fill the holes with toothpicks to hold to holes open when I glaze it. But...worth it. I think it turned out rather nice for a first shot at it. Mmhmm mmhmm.


We shall see if it works out. I will post finished pictures once it is glazed!


Thursday, February 14, 2013

Trying my hand at something new....

I am not usually one for making plaster molds. It's tedious, frustrating, and I am frequently impatient. However, I got my hands on a brain model and would just love to have porcelain brains hanging around in some gallery. So I set off to make a brain mold. I decided to do it the long and safe way. 


So I wrapped the brain in all-purpose silicone. Before that, the brain was coated in a vaseline like wax, so the silicone would slip right off. 


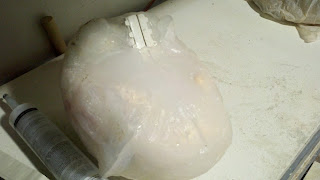
I then built up clay around the silicone mold to make a mother mold. Since silicone is so flexible, it has to have a plaster outer coating to prevent expansion of the mold. So I started to pour plaster. 


And poured.....


And sealed.....


And poured again. 


So I finaly had a mother mold! I pulled out the plastic brain, sealed the mold back up, and poured it full of pottery plaster. 

Lo and behold!! A plaster brain. However....not all was well....

The top turned out great.


But the bottom didn't fill up! Ooops. My pour hole was lower than the top of the mold was. 


It created a very flat bottomed brain. 


Plus....I didn't get it sealed up quite right, so there was a horrible seam line down it as well. But I love it anyway. 


I have resealed the brain. Poured a tighter mold. And added more pour spouts so I can fill every aspect of the brain. 


And by tomorrow, we will see how it went. It's a work in process and I will keep updating as I go along.